


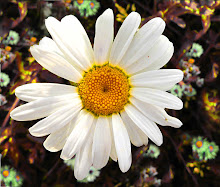
Here are 2 examples of autochromes. For those lucky enough to have one you will understand a little more of what this explanation of the process means by looking at it up close and seeing the lines that you can only see if looking directly at the 2 sandwiched glass plates.
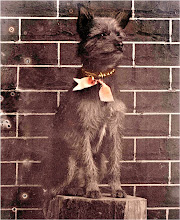
The first image is mine and was one of a series of 4 that I purchased on Ebay years ago. It is almost impossible to photograph these glass positives as you cannot scan them and you must stand in the shadow outside and shoot the image through the sun so your arm is stretched out into the sun while you sit in shadow. Its not easy... The second image is from my friend in France and it very much shows the different chemical and visual transformations that can take place when the elements work on the emulsion. Here is the somewhat technical description of an autochrome. The size varies but mine are all around 3X4 inches and taped around the edges.
Wikipedia says,"
Autochrome is an additive color 'screen-plate' process: the medium contains a glass plate, overlaying random mosaic of microscopic grains of potato starch, with lampblack filling the space between grains, and an impermeable black-and-white, panchromatic silver halide emulsion. The grains are a mixture of those dyed orange, green and violet, which act as color filters.[3] The plate is processed as a slide — that is, the plate is first developed to a negative image and then reversed to a positive image — and the starch grains remain in alignment with the emulsion after processing in order to allow the colors to be seen properly.
To create the Autochrome plates, a slightly concave glass plate was coated with a mixture of pitch (crude pine sap), and beeswax. The starch grains, graded to between 5 and 10 micrometres in size, were coated on top of the plate. The exact methods by which they were coated still remain unclear, although it is known that approximately four million grains per square inch coated the filter in a single layer. It was later discovered that applying extreme pressure to the plate — around 5,00 kg/cm² — would improve the quality of the image, as the starch grains would be flattened slightly, reducing graininess and transmitting more light to the emulsion. Lampblack was then applied by a machine in order to fill the clear spaces between the grains. After this, the plate was coated with shellac. This served to protect the color mosaic and provided a flat surface for the emulsion, which was spread on the plate once the shellac dried.
The 1906 U.S. patent describes the process more generally: the grains can be orange, violet, and green, or red, yellow, and blue (or "any number of colors"), optionally with black powder filling the gaps.
Autochromes are expensive and hard to find so if you do find one, keep it...


1 comment:
Wow, wow, wow, that is great info, thanks for writing all that and teaching us something in the process. That second autochrome is a bit eerie!
Found your blog thru the POE blog. :0)
Post a Comment